Wednesday, August 30, 2023

Fall cards using Woodblock Stamps

 Hi everyone.  I have 2 Fall cards today.  Can you tell I'm ready for Fall? I decided to make these cards using some woodblock stamps for Woodblock Wednesday that starts today hosted by my friend Amy Tsuruta


For my cards today I used some woodblock stamps that my Mom had bought me years ago.  It's a set of leaves, apple, pumpkin, and sentiments.  I love the set.  I started out with white cardstock 4 x 5.25 panel and stamped the leaves stamp with Catherine Pooler Mandarin Spice ink.  I liked how it looked as borders across my page.  I then took a blending brush and ink blended some Mandarin Spice all over my panel.


Next, I spritzed my panel with water and placed it into a embossing folder from Simon Says Stamp called Pinpoint Starlets. I love the texture. I then glued my panel to a A2 card base.  I stamped a sentiment from one the woodblocks in the set with black ink on white cardstock.  I then cut it to layer on some cardstock I ink blended with mandarin spice ink.  I glued them to my card and added some sequins to match.


On my second card, I also used the leaves woodblock stamp.  I chose not to stamp the whole panel this time.  I used Catherine Pooler Eucalyptus ink for this one.  


I also spritzed my panel with water and placed it in the same embossing folder but I made sure not to emboss the whole panel.  I then ink blended some Eucalyptus ink onto my panel.  I think it makes two different looks compared to my other card that I ink blended before going in the embossing folder with water. I ink blended some cardstock with eucalyptus ink and layered a different sentiment I had stamped from the woodblock stamps.  My panel was then glued to a A2 card base.  I added some sequins to match.  That finishes my 2 cards today.  I hope you like them.  I had fun making them.  Which card do you like better?

Supplies:

Catherine Pooler Mandarin Spice ink cube

Catherine Pooler Eucalyptus ink cube

Simon Says Stamp Pinpoint Embossing Folder


Affiliate Links have been added but of course no extra charge to you. 

I appreciate your support.  It means a lot.


Monday, August 28, 2023

Fall inspired Leaf Cards

 Hello everyone.  I made some Fall inspired Leaf Cards.  I was inspired by a Background die by Altenew that is new to me and had been in my stash for awhile now ready to get used.  It's so hard to believe we are almost in September.  Oh my gosh these days go by way too fast.


Here are my Fall inspired cards.


This is the first card I made.  I started out with a yellow cardstock and ink blended it with Distress inks in Mustard Seed Oxide, Ripe Persimmon Oxide, and Peeled Paint.  I inked them diagonally first and then I ink blended the corners.  These are my favorite colors for Fall.  I then splattered some gold paint from my Gansai Tambi starry colors with a fan paint brush. I then used an Altenew Zero Waste Leaf Pattern Die.  I cut out my background and it cut out everything including all the leaves and circles.  

I cut my negative background with my paper trimmer to be A2 size and glued it to a gray A2 card base.  I started putting some leaves and circles back into the negative background with foam tape and liquid glue.  I also used the Altenew Zero waste leaf die with a light brown cardstock and glued some of those leaves and circles back in place.   I ink blended some areas with Vintage Photo distress ink.   I added a sentiment from Simon Says Stamp stamp and die called etched greetings with foam tape.  I then glued some leaf and sequin embellishments.


And for my second card I glued the negative background that I cut earlier for my first card and glued it to a white A2 card base.  I glued in leaves left over from my first card and from the light brown cardstock  that I had die cut with liquid glue and foam tape.  I glued some circles back in too.  It's a nice die to own. I also ink blended with Vintage Photo Distress ink on my card like my first card.  I glued a sentiment with foam tape to my card from the same stamp and die set from Simon Says stamp.  I used fall color sequins and that finishes this card.  I hope you like my cards for today. I had fun making them.

Supplies:

Simon Says Stamp Etched Greetings

Altenew Zero Waste Leaf Pattern

Gansai Tambi Starry Colors

Affiliate Links have been added but of course no extra charge to you. 

I appreciate your support.  It means a lot.


Friday, August 25, 2023

With Love

 Hi everyone.  I am so back to be back I had a busy week and felt like I lost my mojo for a few days.  I was able to put together a fun and easy card.  I hope you like it.


I chose to use this fun beautiful Anya from the The Greeting Farm Anya Reboot Stamp set.  I stamped her on white cardstock and colored her in with my copic markers. I then fussy cut her out.  I used a Scalloped rectangle die and cut out some Doodlebug pattern paper to match Anya.  I cut a border of flowers out for my background.


I have a flowers and leaves die on my desk from Taylored Expressions that was free with a purchase that I cut them out with white cardstock and colored them in with my copic markers to match.  I stamped a sentiment from TGF Cute Script Stamp with black ink on white cardstock. I cut my sentiment out with my paper trimmer.  I glued everything to a A2 card base with liquid glue and I popped up my sentiment with foam tape.  I glued some sequins to match I hope you like my card.  TGF images always make me smile.

Supplies:


Monday, August 21, 2023

Life is Good

 Hi everyone. I have a fun card today.  I have been loving the New Kat Scrappiness Farmhouse Release and I hope you have too.  I have a New card video over on the Kat Scrappiness YouTube Channel. I would love for you to watch.


I started out with white cardstock and stamped all my images from the Farmhouse Stamp with black ink using my Misti Stamping Platform.  I colored my images with copic markers and then used the coordinating Farmhouse dies to cut them out.


Next, I cut out some Farmhouse Pattern Paper.  I love the papers from the New Farmhouse Paper Pack.  I used a A2 Embossed Edge Rectangle to cut my pattern paper out.  I also cut out the Slimline Wire and Woodgrain Frame die with Kraft cardstock.  I love that it looks like chicken wire for my scene card design.  I did cut it down to fit my card.  I then stamped and heat embossed a sentiment from the Farmhouse Sentiments stamp with white embossing powder on black cardstock.  I used the coordinating die to cut out my sentiment.  I also layered it on 2 more die-cuts for dimension.


I glued everything to a A2 kraft card base and I added some White Confetti Sprinkles and white gel accents with my white gel pen. My farm is popped up with foam tape for some dimension. That finishes my card.  I hope you like it.

Thank you for stopping by!

Supplies:


Farmhouse Dies


Affiliate Links have been added but of course no extra charge to you when you use my links.
Thank you so much for your support, I appreciate it.

Copic Markers Used:
E17, E74, Bg13, Bg15, BG10, R08, R14, R27, Y35, Y15, 


Friday, August 18, 2023

Life is Beautiful

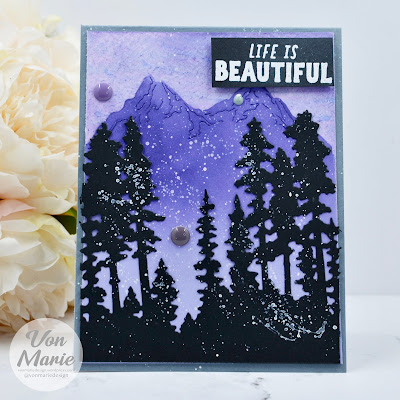
 Hi everyone.  I recently received My Monthly Hero Kit for August.  I love the theme with landscapes.  So I made a card.


I first started out with Watercolor Cardstock from Taylored Expressions.  I chose to use my Tim Holtz Distress watercolor Pencils in Faded Jeans, Shaded Lilac, Salty Ocean, and Picked Raspberry from Sets 1 & 3.  I had fun coloring directly on the Cardstock and using color from my stamp block with water and a big paintbrush.  I then used Villainous Distress ink and ink blended over my watercolor.  I then applied some more watercolor pencils.  I cut my background to 4x 5 1/4.


I cut out the mountains using the die included in the kit with lavender Cardstock.  I then cut it down and glued it to my background.  I cut out my trees out using another die from the kit with black Cardstock.  I glued everything to a dark gray top folding heavy weight card base. 


I then flicked some Picket Fence Distress Spray Stain with a paintbrush over my card.  I stamped and heat embossed my sentiment from the kit using white dye ink and WOW Bright White embossing powder on black Cardstock.  I cut my sentiment and adhered it to my card with foam strips. 


 I embellished my card using some enamel dots from Gina Marie Designs.  I hope you like my card.  I had a blast making it.  I also will be linking my card to the Anything Goes Challenge Stay Crafty With A Blog Named Hero.

Until Next Time, happy Crafting!


Tuesday, August 15, 2023

Circle Quilt Mid Month Motivation

 Hi everyone.  Today we are featuring a brand New stencil called the Circle Quilt Stencil from A Colorful Life Designs.  And the best part is it is on sale for a limited time.  You can also use my code VonFan10 to save 10% off your purchase for extra savings.


I used the New Circle Quilt Stencil with blues and greens.  On my white cardstock, I ink blended using Prinkfresh Studio Ocean Breeze and Tidal Pond Ink Cubes.  I love how it came out.


I cut out my background with a Gina Marie Designs Double Stitched Rectangle die and glued my panel to a A2 side folding card base using liquid glue.


I stamped and heat embossed my sentiment from the New Glitter Stamp on black cardstock and I added foam tape to adhere to my panel.  I also added a word die-cut and shadow that I ink blended to match and added glitter paste to it for fun. Lastly, I added black embellishments.  I hope you like my card.  It's a beautiful stencil and I hope you grab it while it's on sale and don't forget to use my code VonFan10 to save 10% off your purchase.  Shop the New Release here

Supplies:


Glitter Stamp


Affiliate Links have been added but of course no extra charge to you when you use my links.  Thank you so much for your support, I appreciate it.


Merry And Bright

 Hello everyone.  I have another card for the BYSHC Sketch 36.  I think this is such a fun sketch for your Holiday cards.


On my card, I used the Spellbinders Christmas Tree Topiary Die Set.  I believe it was free with a purchase from Scrapbook.com when I got it.  I cut the dies out with green, red, and white cardstock. I also cut out some pattern papers from my stash and cut them out accordingly to the sketch 36.


I glued everything to a A2 card base and added a sentiment strip from my stash.
That finishes my card.  I hope you like it.  I also hope you join us over in the FB group where you can add your card to the album.  You still have time. Challenge ends on August 31, 2023.


Monday, August 14, 2023

Birthday card using Teen Doll

 Hi everyone.  I have a fun Birthday card to share with you using the Teen Doll Stencil from A Colorful Life Designs.

Teen Doll Stencil

020206 - Teen Doll Stencil


I have had this stencil for quite awhile before I was on A Colorful Life Designs Team.  I had planned on making my daughter a Barbie Birthday card when I purchased it.  Now, that Barbie is so popular I had to ink up this Teen Doll Stencil.  On white Cardstock I used Picked Raspberry Distress Oxide ink.  I then cut it out with a stitched A2 rectangle die.


I stamped a sentiment from the Happy Thoughts Stamp set with Versafine Black ink using my Misti stamping Platform.  I glued my panel to a A2 card base and added a black foiled glossy white sentiment from my stash using a foam strip.  I glued some pink sequins fro fun.  I hope you like my Barbie card.  I will have to make more.  Don't forget to use my code VonFan10 to save 10% off your purchase.

Affiliate Links have been added but of course no extra charge to you.  I appreciate your support.  It means a lot.


Sunday, August 13, 2023

Hello Friend

 Hi everyone.  I have a card today using New Stencils from A Colorful Life Designs.  You can use my code VonFan10 to save 10% off your purchase anytime.


I had fun with the New Marvelous Masks Grand Arch Stencils for my card today.  I used both sets A and B.  It is best to have both sets because of their sizes. They layer perfectly together when you have both sets.  On white cardstock, I started out with the 5.5 Grand Arch Stencil size using Concord and 9th Midnight ink.  Next, I used stencil 5 with Concord and 9th Butter ink. Next, it was stencil 4.5 Concord and 9th Aspen ink.  For the door, I used Stencil 2.5 with Tea Dye Distress ink and stencil 2 with Vintage Photo Distress ink.


To complete my bird house I used Lawn Fawn Magic Iris Birdhouse die set and ink blended my bird, roof, door knob, floor, leaves and flowers using the same ink colors as my ink blended grand Arches stencils.  I ink blended carefully around my Arches for some clouds using the cloud edger stencil with Midnight ink. I cut out my background using a A2 stitched rectangle die and stamped a sentiment from Let's Go Nuts Stamp by Lawn Fawn.  I glued everything to a A2 card base and added sequins and white gel accents and my black gel pen for the birds eye.  I hope you like my card today.  Don't forget to use my code VonFan10 to save.  Shop the Newest Release here

Supplies:


Affiliate Links have been added but of course no extra charge to you when you use my links.

Thank you so much for your support, I appreciate it.


I Chews You

 Hello everyone.  I have a card to share using A Colorful life Designs New May Release.  If you love to make cat or dog cards then this mont...