Thursday, November 30, 2023

Lawn Fawn Little Snow Globe Holiday Dog Cards

 Hello everyone.  I have some easy but cute Holiday cards today using Lawn Fawn's Little Snow Globe Collection Dog Stamp.  


For both my cards, I stamped all my images onto white cardstock with Lawn Fawn Jet Black ink and cut them out with my Brother Scan N Cut Machine.  I then colored them in with my Copic Markers.

This was my first card I put together.  The foiled pattern paper is from Lawn Fawn.  It was a little hard to photograph but I assure you it's pretty.  I made a ground, I was going for snowflake wallpaper and a wood floor with base board.


I stamped a sentiment from the Lawn Fawn Stamp set Winter Scribbled Sentiments with black ink on my wood floor. paper strip.  I glued everything to a A2 white card base.  I added some drops of Lawn Fawn glitter glaze on a few snowflakes and globe.  I also used my white gelly roll pen for highlights.  I love the dog and his cute deer hat.


Here is another card I made.  I'm really into green this year and I always love snowflakes and of course Lawn fawn.  I did the same with this card only I colored the dog differently and he has a Santa Hat from Little Snow Globe Bear Stamp.  This pattern paper is different and is from Joanns. I also used a different image for the snow globe. I love snow globes so much. I then glued everything to a green A2 Card base.  Later, I added some glitter glaze to the snowflakes.  I did use my Gelly roll pen for highlights on this card too.


I was going to add my sentiment cut to fit my card front but I didn't like the look, so I placed it inside my card instead.


I hope you like my cards.  I had so much fun making them.  I also may have shopped lawn Fawn's Black Friday sale.  So more Lawn Fawn cards are coming.  I will be linking my cards to the Lawn Fawnatics Challenge-Holiday Critters #161 and to Simon says Stamp Wednesday Challenge-Anything Goes.


Wednesday, November 29, 2023

Woodblock Wednesday Elegant Woman and Dog

 Hello everyone.  Today starts one of my favorite Challenges called Woodblock Wednesday hosted by my friend Amy Tsuruta.  I always enjoy participating in her Woodblock Stamp challenges. And my Woodblock Stamps get to get some love yay.


I recently picked up this Hero Arts Elegant Woman and Dog Woodblock Stamp from Joanns that was on clearance.  I think it's fabulous. I stamped my woodblock stamp with Brutus Monroe Raven Black ink on this natural colored cardstock.  I then colored it with my Copic Markers and a white colored pencil.  I cut my cardstock and put it to the side.


I cut some aqua polkadot pattern pape from my stashr for layering.  I felt like using a embossing folder so I chose Spellbinders Sketched Floral embossing folder from a previous club kit and ran it through my Spellbinders Platinum diecutting machine with a white A2 panel.  I then ink blended it with Peacock Feathers Distress ink.


Next, I used a circle paper pinch from Creative memories with black cardstock.  I stamped and heat embossed my Woodblock Sentiment from Hero Arts called Happy Birthday To You that I may have gotten last year from Joanns.  I used Hero Arts Unicorn white ink and white embossing powder.  I then glued everything to a A2 card base using my Tombow Mono Multi liquid glue.  I added some sequins to match and that finishes my Birthday card.  I hope you like it.  I hope you will join the challenge too, it's so much fun.

Supplies:

Hero Arts Happy Birthday To You Woodblock Stamp

Brutus Monroe Raven Black ink

Tombow Mono Multi Liquid Glue

Hero Arts Ink Cubes

Affiliate Links have been added but of course no extra charge to you.  

I appreciate your support.  It means a lot.


Tuesday, November 28, 2023

Santa Claus Holiday Card

 Hello everyone.  I have my last card sample to share using the New layered Ho Ho Ho stencil from A Colorful Life Designs.  Use my code VonFan10 to save 10% off your purchase.


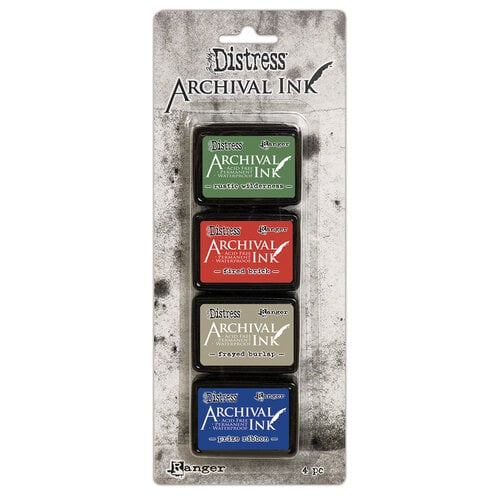
I love this stencil Ho Ho Ho it consists of 4 sencils and they are all labeled.  It's easier to line of the letters if you use your stamping platform or something or another tool to help you line up your your stencils. Also I found that smaller blending brushes are easier to ink up the letters.  I hope that helps.  After, you do it once it's very easy to do for your next projects.  I started out with white cardstock, I used Archival Ranger ink cubes in Rustic Wilderness, Fired Brick, Frayed Burlap, and Prize Ribbon. I used 4 inks by choice but you can do 1 or 2 inks too.  I then cut my background to A2 size 4 1/4 x 5 1/2.


Next, I used this cute Santa that was already stamped on a circle die-cut in my stash from Doodlebug. I colored it in with my alcohol markers Ohuhu and glued it to my panel with liquid glue.  I stamped a sentiment from Mama Elephant Mini Merry Messages stamp set with black ink on white cardstock and then cut it out with my paper trimmer. I then glued it to my panel.  My panel was then glued to a A2 card base.  I chose not to use any embellishments on this card. I hope you like it and grab this stencil set. You can check out the New Release here.

Supplies:


Affiliate Links have been added but of course no extra charge to you.  

I appreciate your support.  It means a lot.


Friday, November 24, 2023

Holiday Card Using The Christmas Cover Stencil

 Hi everyone.  I have a Holiday card today using a stencil from A Colorful Life Designs that's included in the Thankful For You BOGO Sale.

Shop the sale here


I used the Christmas Cover Stencil.  I love this stencil and I'm so excited it's in the Sale.  On white cardstock, I in blended the bow with Catherine Pooler Juniper Mist ink and for the snowflakes I ink blended Catherine Pooler Something Borrowed ink.  I then flicked some blue metallic paint with some water and a paint brush.


When my background was dry I cut it out with a Scalloped Rectangle die and glued it to a A2 card base.  I have some Tim Holtz Christmas Sentiment Stickers so I added one of those and some sequins.  I hope you like my card and grab this Unique Stencil that's included in the BOGO sale.

Supplies:

Christmas Cover Stencil


Affiliate Links have been added but of course no extra charge to you.  

I appreciate your support.  It means a lot.


Wednesday, November 22, 2023

Quirky Christmas Trees and Thankful For You Sale

 Hi everyone. I have a Holiday card to share using A Colorful Life Designs and A Colorful Life Designs has a BOGO Sale starting today yay.  You can't use my code on the sale but you can use my affiliate link.  There are several stencils listed for the BOGO Sale.  

Shop A Colorful Life Designs Sale Here


I used The Quirky Trees Stencil that is included in the Thankful For You Sale.  This is such a fun stencil.  On white cardstock I ink blended the stencil with Catherine Pooler Aquatini ink and Catherine Pooler Lime Rickey ink. When I was done ink blending I used some Gansai Tambi Opal paint colors in Opal Gold paint using a paintbrush and water to splatter my background.  I also used Sour Green Apple Metallic Hydracolour paint to splatter my background.


I then cut my background to be 4 x 5 1/4.  I used a paper punch tree from my stash with white cardstock and ink blended it in the same ink colors to match.  I glued everything to a A2 card base and I found a sentiment strip in my stash from Taylored Expressions and adhered it to my card.  Lastly, I added some sequins to match.  I hope you like my card and grab this stencil or others they make great Christmas Gifts.  Sale ends 11/26/23 Midnight.  Happy Shopping.  If your shopping for stencils not included in the sale use VonFan10 to save.

Supplies:

A Colorful Life Designs Sale

Quirky Trees Stencil

Catherine Pooler Aquatini ink

Catherine Pooler Lime Rickey ink

Taylored Expressions Simple Strips Christmas

Taylored Expressions Simple Strips Dies

Gansai Tambi Opal Paint Colors

Affiliate Links have been added but of course no extra charge to you.  

I appreciate your support.  It means a lot.


Monday, November 20, 2023

The Grinch Tree Holiday Card

 Hello everyone.  I hope you are doing well.  I took a nice 2 days off relaxing.  Although I did some craft shopping so that is always nice.  I got me a New planner too. Super excited about that.  I have a fun Holiday card today using a New Stencil from A Colorful Life Designs.  Don't for get to use my code VonFan10 to save 10 % off your purchase.  We have a nice sale coming up on the 22nd.  You don't want to miss it.


Isn't this a cute one?  I love the Grinch and when I seen A Colorful Life Designs Grinch Tree Stencil I was excited to make a Grinch card.  On white cardstock, I ink blended the green tree with Hero Arts Key Lime ink.  I then placed my negative tree stencil over my ink blended tree and ink blended a sky with a blue ink.  I flicked some white paint spatter over my background.  I then cut my background out with a stitched rectangle die.


Next, I stamped this cute grinch from Crackerbox Stamps called Grinch Head on white cardstock with black ink and colored it in with my Copic Markers.  I then fussy cut it out.  I also stamped a sentiment from Crackerbox Stamps Grinches Drink Up and only used some of the sentiment.  I glued everything to a A2 card base and embellished with some Merry Grinchmas Sprinkle Mix to decorate my tree.  I added some white gel accents with my Gelly roll pen and that finishes my card.  I hope you like it.

Supplies:

Grinch Tree Stencil


KS Merry Grinchmas Sprinkle Mix


Affiliate Links have been added but of course no extra charge to you.  

I appreciate your support.  It means a lot.


Friday, November 17, 2023

Christmastime Holiday Card for BYSHC Sketch 39

 Hello everyone.  I have another Holiday Card for BYSHC Sketch 39.  I hope you are enjoying the sketch as much as I am.  


On my card, I cut out red, white, and kraft cardstock according to the sketch.  I then cut out some pattern paper strips from scraps in my stash.  


I then used some Christmas Ephemera die-cuts from Pinkfresh Studio.  I glued everything to a gray A2 card base and lastly added some clear glaze to the lights, wreath, tree, and presents.  I also used my glitter pen to the bow for fun.  I hope you like my card using the sketch 39.  I hope you join us and upload your card to the Build Your Stash Holiday Cardmaking FB album.


Wednesday, November 15, 2023

Big Thank You Stencil for Mid Month Motivation

 Hi everyone.  It's Mid Month Motivation for November at A Colorful Life Designs.  We have a brand new Stencil and it's on sale.  Only once a month you can get a New Stencil and on sale and guess what?  You can use my code VonFan10 to save 10% off the sale price...So cool.


This month's stencil is called Big Thank you.  I love it and you can mass produce your Thank you cards.  We always need them.  I chose kraft cardstock.  I used Pinkfresh Studio Berrrylicious ink, Simon Says Stamp Hot Mama ink, Delicata Golden Glitz ink, and Catherine Pooler Cummerbund ink. I used a bunch of inks but this stencil will look great with 1 ink too.  With my stencil in place I sprayed some Picket Fence Studio Distress Spray.


I cut my cardstock to 4 x 5 1/4 and I glued it to a white heavy duty A2 card base.  I glued some gold sequins and that finishes my easy card for today.  I hope you grab this new stencil it's only on sale for $4 for a few days.

Supplies:

Big Thank You Stencil


Pinkfresh Studio Berrylicious ink

Simon Says Stamp Hot Mama ink

Catherine Pooler Cummerbund ink

Delicata Golden Glitz ink

Picket Fence Distress Spray


Affiliate Links have been added but of course no extra charge to you.  

I appreciate your support.  It means a lot.


Sunday, November 12, 2023

Holiday Card using A Colorful Life Designs

 He everyone.  I have a Holiday card today using a New Stencil and Stamp from A Colorful Life Designs.  Use VonFan10 to save 10% off your purchase.


I used the New Candy Cane Stencil and Season's Tweetings Stamp set.  I used some brushes that had ink residue on them with white cardstock.  I cut my background and stamped a sentiment from the Season's tweetings stamp with black ink.  I then stamped the cute bird also from the Season's Tweetings Stamp set on white cardstock with black ink and colored it in with my Copic Markers.  I fussy cut the bird and and added some Lawn Fawn glitter glaze to the Santa Hat.  


I cut out some red and green glitter cardstock.  I glued everything to a A2 card base and added sequins and white gel accents with my gelly roll pen.  I hope you like my card.  Check out the New Release here

Supplies:


Affiliate Links have been added but of course no extra charge to you.  

I appreciate your support.  It means a lot.


Friday, November 10, 2023

Good Cheer Elf Mug

Hello everyone.  I have my last card for the Fall Winter Coffee Lovers Blog Hop.   


I used a SVG File called Christmas Elf Mug from the Silhouette Design studio.  I used my Silhouette Cameo 3 to cut all my die-cuts out using white cardstock.  I ink blended my die-cuts using Gina K Designs Faded Brick ink, Pinkfresh Studio Emerald City ink, Black Soot Distress Oxide ink, Lost Shadow Distress ink, Fossilized Amber Distress Oxide ink, Broken China Distress Oxide ink, and Lucky Clover Distress ink.  I then glued all my die-cuts together using liquid glue.


I grabbed a A2 piece of red cardstock and I rann it through my diecutting machine using a Gina K Designs Swiss Dots embossing folder.  I then took a sanding block and sanded some of my dots.  I stamped my sentiment with black ink on white cardstock from STAMPlorations Holiday Mocha Feels stamp and then layered it on black cardstock.  I glued everything to a green A2 card base and glued some festive sequins to match.  I hope you like my elf mug.  It was a lot of fun and I enjoy ink blending even when I have colored cardstock.


Tis The Season For A Latte

 Hi everyone.  It's Bittersweet that today is the last day for the Fall Winter Coffee Lovers Blog Hop.  I had so much fun and so many ideas for Coffee cards.  I will have 1 more card later on.


I was given these 2 stamp sets given to me my Crafty Friend Maggie. They are called I heart books stamp and 1 More Chapter stamp from Three Room Studio.  I stamped and heat embossed my images onto watercolor cardstock.  I then watercolored them in with my Tombow markers, a paintbrush, and water.  When I was happy with my results I fussy cut my images.


I cut out some Christmas pattern paper A2 size and then cut out a white cardstock strip for my base board.  I glued everything to a A2 green card base.  I then stamped a sentiment from STAMPlorations called Holiday Mocha Feels with black ink on white cardstock.  I cut my sentiment to be a banner.  I then added sequins and a tree confetti to the big mug.  I hope you like my card, I had so much fun making it.

Supplies:

Mocha Feels Stamp

I heart Books Stamp

1 More Chapter Stamp


I Chews You

 Hello everyone.  I have a card to share using A Colorful life Designs New May Release.  If you love to make cat or dog cards then this mont...