Wednesday, January 31, 2024

BYSHC February Sketch of the Month

 Hello everyone.  There is a New BYSHC Sketch #42 for February.  It's another fun one and Not 2 Shabby is a Sponsor so yay.  Enter your card into the Build Your Stash Cardmakers FB album for a chance to win.


Sketch 42


For my card today, I cut out some pattern paper from Joanns Park Lane Nice List 6x8 paper pad according to the sketch measurements.  I used a older Not 2 Shabby stamp set called Winter Sentiments. On the kraft pattern paper, I used the snowflakes and trees images and stamped them in black ink.


I also stamped the sentiment in black ink on red pattern paper and cut it to fit.  I glued everything to a A2 card base.  I hope you join the sketch challenge this month.  It's a fun way to learn a new sketch and get your Holiday cards finished early.  Annnd there is a prize involved.

Thank you for visiting my blog today.


We Go Together featuring Kat Scrappiness

 Hello everyone.  I have a fun card to share.  Valentine cards always make me happy.  My card today features a New die set from Kat Scrappiness.  It's part of their second Release.  I hope you check out all the New products you will love them as much as I do.


I love how this card turned out.  We Go Together Puzzle Craft dies. You get 2 puzzle pieces, hearts, and 2 faces.  Such a fun die set that you need for your stash.  I believe they can be used for any occasion too.  I first started out cutting out the 2 puzzle pieces  using white cardstock.  I ink blended my puzzle pieces using Prize Ribbon Distress ink and Festive Berries Distress Oxide ink.  


I also ink blended some more white cardstock with the same inks so that I could cut out the Sweet Sentiment Craft die.  I like how it looks purple to with those 2 ink colors ink blended together. It reminds me also of the 4th of July or those rocked ice cream cones.  I also cut out another Sweet Sentiment craft die with white cardstock for a little more dimension.  


I also had enough of my ink blended cardstock to cut some hearts out using the same die set.  You get a variety of hearts which I love.  I cut out the 2 faces using black cardstock.  I also had some Simple Sentiments strips Valentine Edition already stamped and cut out using the coordinating die.  I cut out a white panel to be 4 x 5 1/4 and glued everything to a A2 card base.  I added my simple sentiment strip using a foam strip.  I just love this card.  Hope to send this card out.

Thank you for visiting my blog today.

Supplies:

We Go Together Puzzle Craft Dies

Simple Sentiments Valentine Edition Stamp

Universal Simple Sentiment Coordinating Die

Sweet Sentiment Craft Die

Craft Tools


Affiliate Links have been added but of course no extra charge to you.  

I appreciate your support.  It means a lot.


Tuesday, January 30, 2024

2 Cards Using The Wing Close Up Stencil

 Hello everyone.  I'm so excited to share 2 cards I made with the Wing Close Up stencil from A Colorful Life Designs.  It's a really pretty stencil and can be used for any Occasion.


I had fun making this card.  I applied Pixie Spray to the back of this stencil before laying it on my Pinkfresh Studio retired Happy Blooms yellow pattern paper.  I ink blended the Wing Close Up stencil with Hero Arts Cup O Joe ink and Catherine Pooler Oh Boy ink.  I love how it came out.


Next, I cut out my background with a Lawn Fawn Stitched A2 rectangle die.  I glued my stitched panel to a. A@ card base.  I cut out a word and Shadow die from Simon Says Stamp using white and vellum cardstock.  I then embellished with some Pinkfresh Studio Glacier gems.


Here is my second card.  Since I had vellum cardstock on my desk I chose to use Picked Raspberry Distress Oxide ink using the Wing Close Up stencil.  I think its pretty.  I cut my vellum out using a heart die.  I cut out some pink cardstock to match 4 x 5 1/4.  


I glued my heart and pink cardstock to a A2 card base.  I used a sentiment strip from Spellbinders Advent Calendar 2023 and glued it to my card with liquid glue.  I embellished with some pink sequins.  I hope you like both cards.  They were sure fun to make.  Don't forget to use my code VonFan10 to save 10% off your purchases.

Thank You For Visiting My Blog 💖

Supplies:

Wing Close Up Stencil


Simon Says Stamp You Are Enough Wafer Die

Pinkfresh Studio Glacier Gems


Affiliate Links have been added but of course no extra charge to you.  

I appreciate your support.  It means a lot.


Sunday, January 28, 2024

Heart Path Valentine Card

 Hello everyone.  I'm sharing my last card sample for A Colorful Life Designs January Release.  It's a Valentine card using 2 New Stencils.  February Release will be here soon and I can't wait to share with you those projects. So Stay tuned.


On my card today, I used the New Heart Path Stencil and New Shadowed Valentine Stencil.  On white cardstock I ink blended with Festive Berries Distress Oxide ink.  I then used Nuvo Glacier paste in Frosted Petal that I applied with a spatula.


I cut my stenciled background to be 4 x 5 1/4 and used a strip for the inside on my card.


Next, I glued my panel to a pink A2 card base.  I then used the Happy Valentine Stencil for my sentiment. It has a strip and a sentient.  You can easily make a bunch of sentiments using different ink colors.  Super fun.  I ink blended my strip with Festive Berries Distress Oxide ink on white cardstock with a heavier hand.  I then ink blended the sentiment using black ink.  I cut my sentiment with my paper trimmer.  I applied my sentiment with foam tape and glued some sequins to match.  This card was really easy to make.  I hope you shop the New Release.  Use VonFan10 to save 10% off your purchase.

Thank you for stopping by!

Supplies:

Heart Path Stencil


Affiliate Links have been added but of course no extra charge to you.  

I appreciate your support.  It means a lot.


Friday, January 26, 2024

Scalloped Heart Shaped Porcupine Love Card

 Hello everyone.  I'm super excited to share a Scalloped Heart Shaped Valentine card or it can be a anytime card.  You don't need a Holiday to say you love someone.  And especially when you use Lawn Fawn.  Who agrees with me?


Isn't it cute?  I love Purple and pink together, so fun.  I first started out stamping some images from the  Porcu-Pine For You Stamp, and Porcu-Pine For You Add on stamp on Neenah Solar White 80lb. with Lawn Fawn Jet Black ink.  I colored them in with my Copic markers and then used my Brother Scan N Cut to cut them all out.


I then cut out the Giant Outlined Love Ya die with purple and white cardstock.  I also cut out some large Scalloped Hearts using a older Sizzix die set with white and pink cardstock.  I ink blended a white scalloped heart die-cut with Hero Arts Hues Taffy ink cube using my large Blending Brush.  I glued my purple Giant Outlined Love Ya heart onto that scalloped heart die-cut.  I then inlaid some small hearts with liquid glue that I copic colored from the white die-cut.  I also inlaid the inner O and A back in place with liquid glue.  Even though I covered them later.  

Next, I glued my Porcu-Pines and other small cute images, I used my teflon bone folder to crease to make my card base.  I then glued my Scalloped card together with liquid glue. 


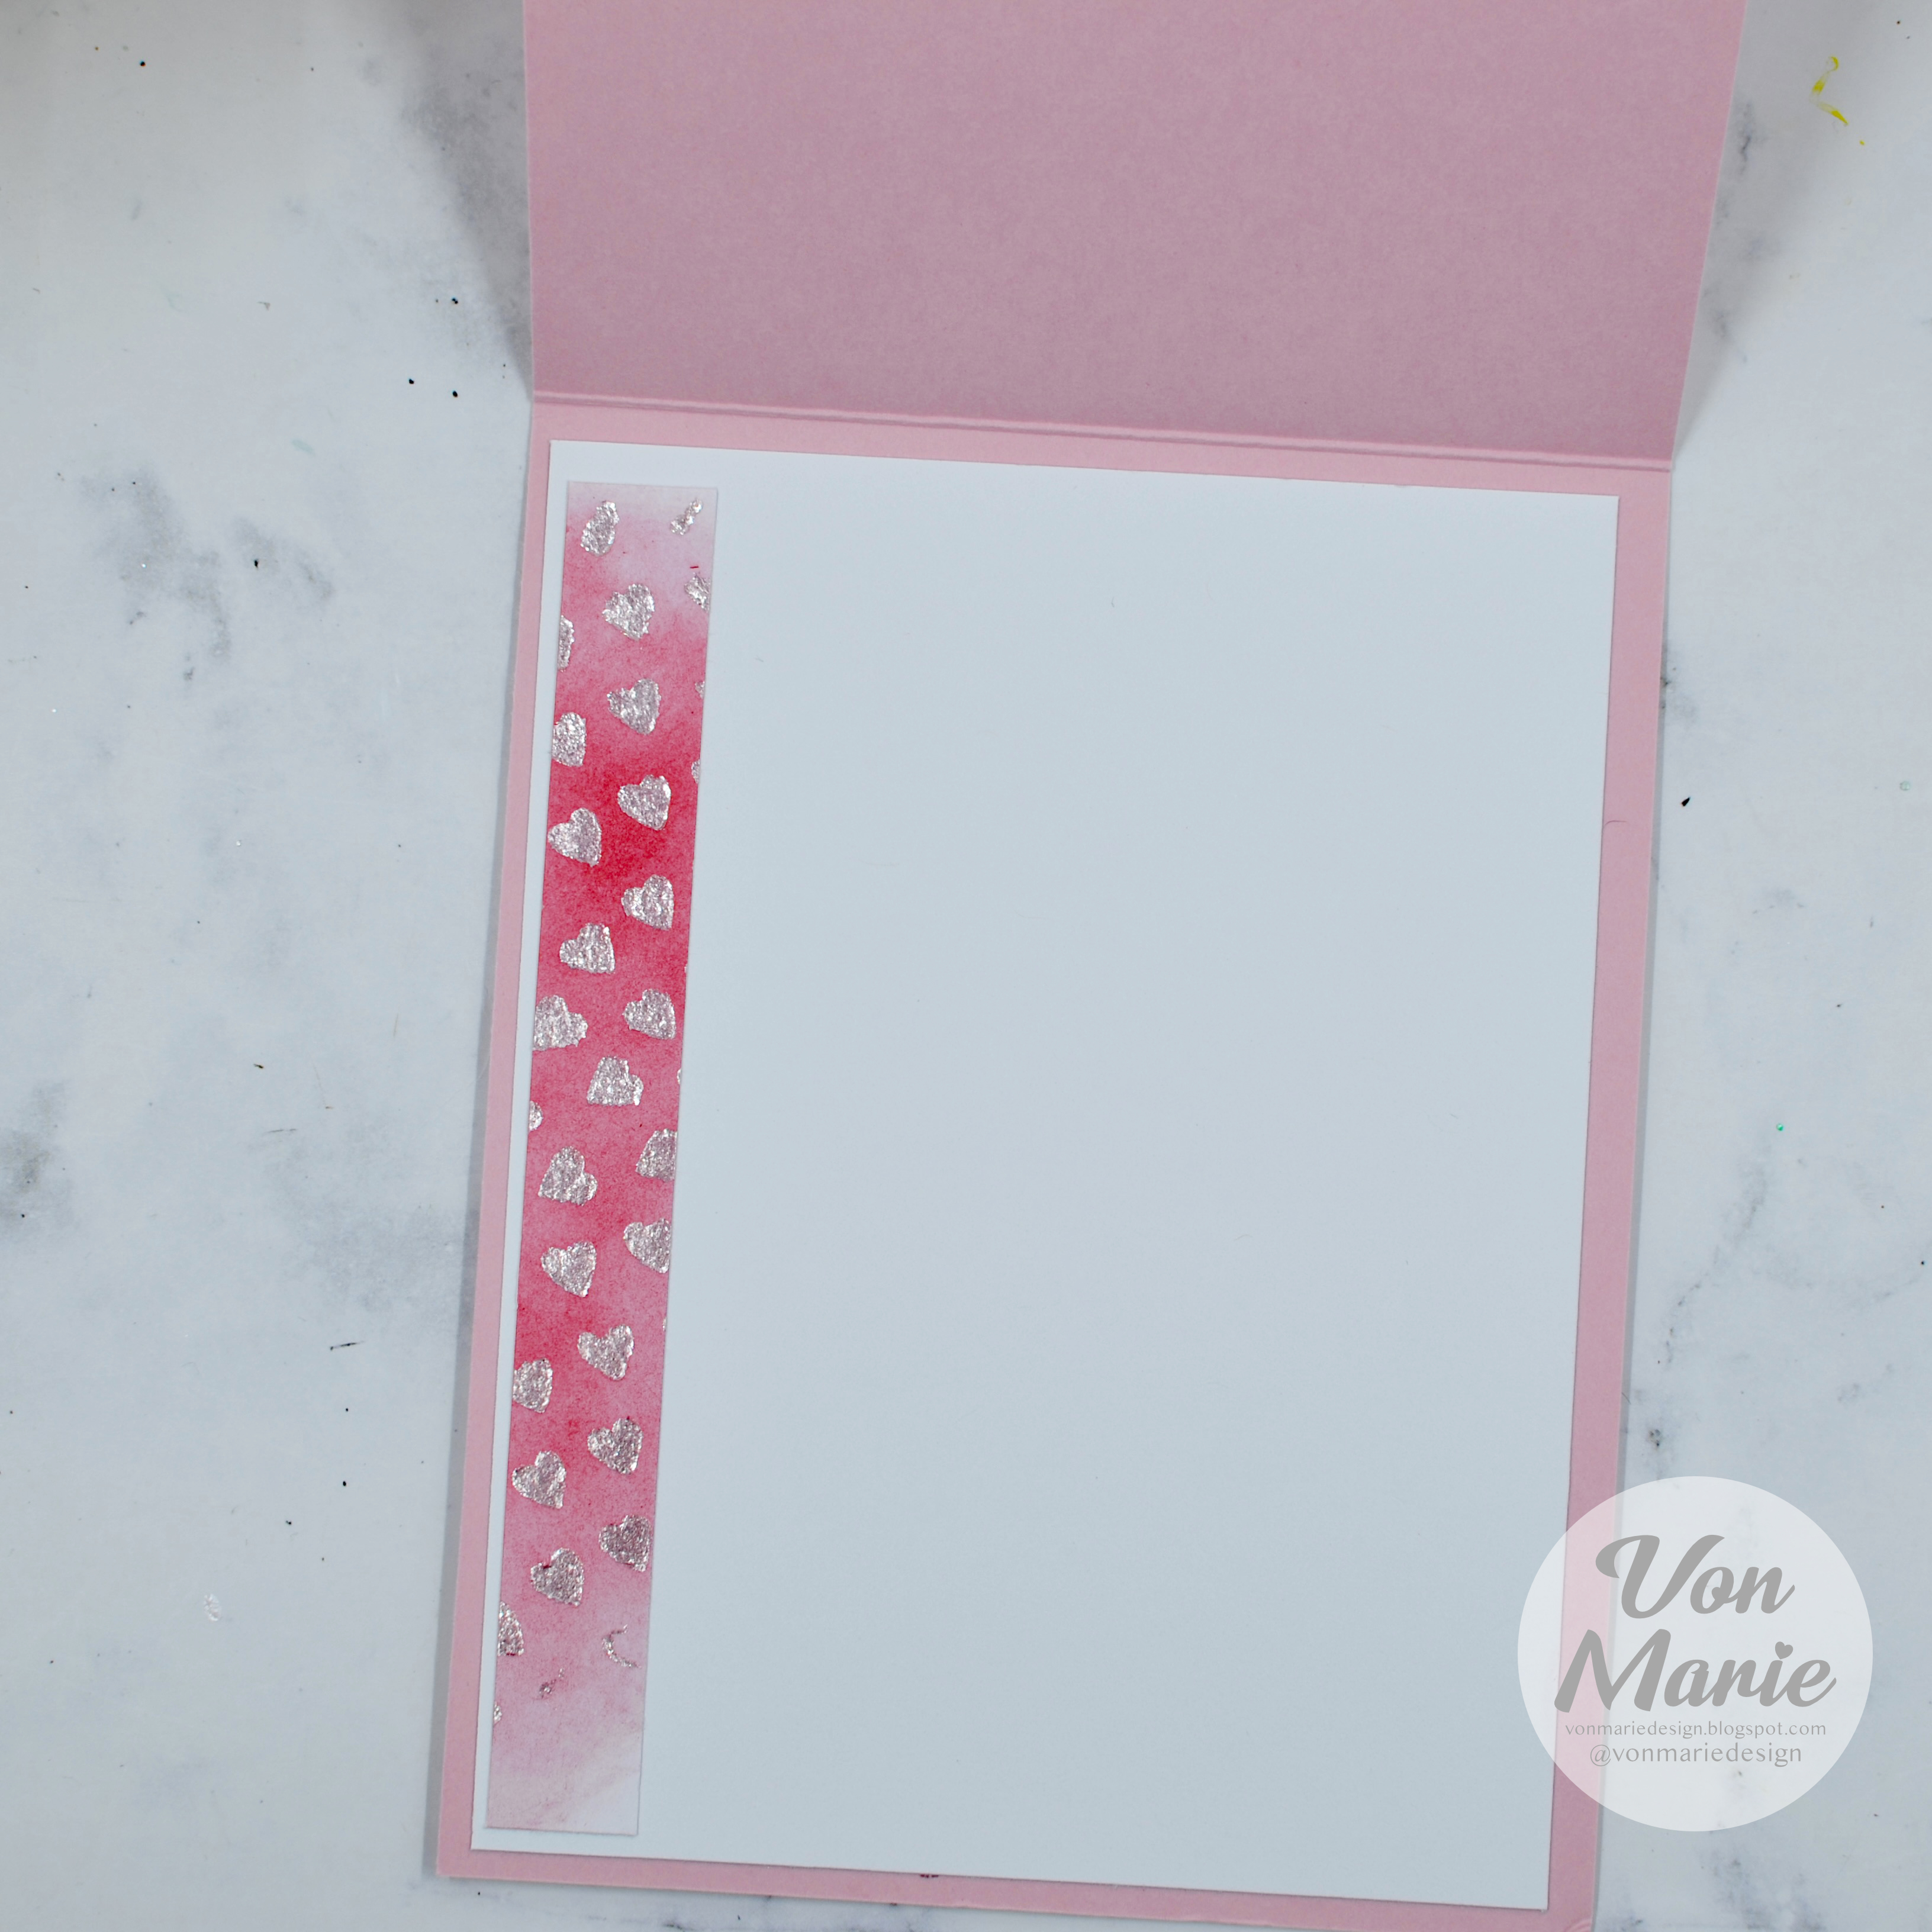
Here is the inside of my card.  I cut out a smaller scalloped heart and stamped a sentiment from the Porcu-Pine For You Add On using Taffy ink. 


I also stamped a smaller sentiment on my card from the Porcu-Pine For You stamp using Versafine black Onyx ink.  I added a few white gel accents using my white Gelly Roll pen. This card will fit in a A7 envelope.  I hope you like my Scalloped Heart shaped card.  I think its full of LOVE. I also will be linking my card to the Lawn Fawnatics Challenge Lots of Heart #165.

Thank you for stopping by!

Supplies:

Lawn Fawn Porcu-Pine For You Stamp

Lawn Fawn Porcu-Pine For You Add On Stamp

Lawn Fawn Giant Outlined Love Ya Die


Hero Arts Hues Taffy Ink


Simon Says Stamp Large Blending Brush

Versafine Onyx Black Ink

Lawn Fawn Jet Black ink


Affiliate Links have been added but of course no extra charge to you.  

I appreciate your support.  It means a lot.


Thursday, January 25, 2024

Star Happy Birthday Card

 Hello everyone.  I have a Birthday card to share using A Colorful Life Designs New January Release.  Did you know you can get card bling at A Colorful Life Designs? Isn't that great? Use VonFan10 to save 10% off your purchase.


I chose to make a Birthday card using the New 16 Star Shadow Stencil.  I started out with white cardstock and ink blended with Hero Arts Hues ink cube in Azalea.  I chose to mask in the center of my background so that I could use the Balloon Set Stencil.  The Balloon set Stencil has a Star Ballon that matches.  So I used Hero Arts Hues ink cube in Paradise for the balloon and string.  


I cut my background to A2 size.  I stamped a sentiment from a older STAMPtember collaboration with Honey bee Stamps and Simon says stamp with black ink.  I also stamped the bow from the same stamp set.  I glued my panel to a A2 pink heavy weight card base. Lastly, I added some iridescent star embellishments to match.  I hope you like it.  I think it's a fun card.

Thank you for stopping by.

Supplies:

16 Star Shadow Stencil


Balloon Set Stencil


Affiliate Links have been added but of course no extra charge to you.  

I appreciate your support.  It means a lot.


Wednesday, January 24, 2024

You're One Of A Kind

 Hello everyone.  I have a card to share with you using a New stencil from A Colorful Life Designs January Release.  Use VonFan10 to save 10% off your purchase.


This stencil is called A Bunch of Birds Stencil.  Isn't it cute? I love it.  I started out with white cardstock and ink blended my birds with Hickory Smoke Distress ink and Fossilized Amber Distress Oxide ink.  I then used my Prismacolor Colored pencils in gray and white to add some details on my birds.  I then cut out my background with a A2 Scalloped Rectangle die.


I glued my panel to a gray A2 card base.  I stamped and heat embossed a sentiment from Simon Says Stamp Birthday Wishes Stamp with white embossing powder on gray cardstock.  I cut my sentiment into a fishtail banner using my paper trimmer and scissors.  I then added some Sunshine gems from Pinkfresh Studio.  I hope you like my card.  I love gray, white, and yellow together.

Thank you for stopping by!

Supplies:

A Bunch Of Birds Stencil


Simon Says Stamp Birthday Wishes Stamp

Pinkfresh Studio Sunshine Gems


Affiliate Links have been added but of course no extra charge to you.  

I appreciate your support.  It means a lot.


Monday, January 22, 2024

Dancin Mouse, Coffee, and Snowflakes

 Hello everyone I have a card I made for the current Caffeinated Christmas Card Challenge Coffee+Snowflakes.  I chose to used this cute Spellbinders Die Set that I got in December last month/year.


I love this cute series of dance dies from Spellbinders.  I have been collecting them. This one is called Dancin and Giftin Mouse.  I started out using a white A2 cardstock panel with a Filigree Snowflakes embossing folder from Simon Says Stamp. I ran it through my Spellbinders Platinum Aqua 6 Machine using the perfect sandwich plates. I then ink blended it a little with Hickory Smoke Distress ink. Next, I then ran my mouse dies through my die-cutting machine using white, pink, blue, purple, and black cardstock.  


I ink blended the head and ears with Hickory Distress ink.  I made her boots with multiple layers as I wanted them to be thick die-cuts.  I cut out a retired small coffee to-go cup from a CC Designs die set that I had in my stash and I thought it was the perfect size for my mouse.  I cut it out with white and purple cardstock.  


Next, I cut my embossed panel to be smaller than A2 size. 4 x 5 1/4.  I glued my mouse to my panel using foam squares so that my mouse could move.  I made sure to not glue the legs.  I love her holding a coffee.  I stamped a sentiment from STAMPlorations Holiday Mocha Feels for on white cardstock with black ink.  I cut it to be a fishtail banner.  I glued my panel to a white A2 card base and attached my sentiment with foam tape.  I embellished with snowflakes and added some white gel accents with a gelly roll pen.  I hope you like my card.  I had fun making it.  I love making her dance.

Thank you for stopping by!

Supplies:


Affiliate Links have been added but of course no extra charge to you.  

I appreciate your support.  It means a lot.


Saturday, January 20, 2024

Pour Yourself A Latte

 Hello everyone.  I'm so excited to share my card using Pour Yourself A Latte Stamp and Coordinating Craft Dies from Kat Scrappiness.

Kat Scrappiness is having a Flash 48hr Sale.  No code needed. Shop the sale here. 40% off selected KS Exclusive items. Sale ends January 21, 2024 @Midnight PST.


I started out stamping and embossing some of the Latte Cups, Steam, and floral images with Versafine ink and clear embossing powder on Neenah Solar White 80lb. Cardstock.  I used my copic markers and Ohuhu Markers to color in my images and then used the coordinating dies to cut everything out.  Next, I cut out the A2 Qbert Quilt background die out with white cardtock.  I used the A2 Qbert Stencil to coordinate with the die-cut.  I then ink blended with Ground Espresso Distress ink.  I stamped the Swan Coffee Art with Lawn Fawn Crunchy Leaf ink and heat embossed it using my clear embossing powder for the inside of my latte cup.   You can also use the die to cut out the art for more dimension.


I used a rectangle die from the Embossed Rectangle dies with white cardstock to ink blend with Ground Espresso Distress ink to lay my latte cup on.   I cut the rest of the die-cut using my paper trimmer.  I only wanted a small piece of the rectangle.  I also used the new Love is in the Air Stencil on my Qbert Quilt ink blended die-cut using 2 different brown inks.  Ground Espresso Distress ink and Lawn fawn Crunchy Leaf ink.  I love how it came out.  


I then used the Got Coffee Shadow Sentiment Craft Die using the word die only and cut it out with a aqua colored cardstock to match.  I used a copic marker and gave some shadows on my die-cut.  I glued everything to a Aqua A2 heavy weight cardstock card base using liquid glue.  Lastly, I embellished my card using the Sparkling Seashore embellishment Sprinkle Mix.  I hope you like my card.  It was so much fun to make.  I hope you take advantage of the 48hr Flash Sale at Kat Scrappiness.

Thank you for stopping by!

Supplies:


Affiliate Links have been added but of course no extra charge to you.  

I appreciate your support.  It means a lot.


I Chews You

 Hello everyone.  I have a card to share using A Colorful life Designs New May Release.  If you love to make cat or dog cards then this mont...