Saturday, November 30, 2024

Christmas Card Using Whimsy Stamps

 Hello everyone.  I'm so excited to be participating in a Whimsy Stamps and Ranger Ink Christmas Hop on Instagram today.  It's so much fun.


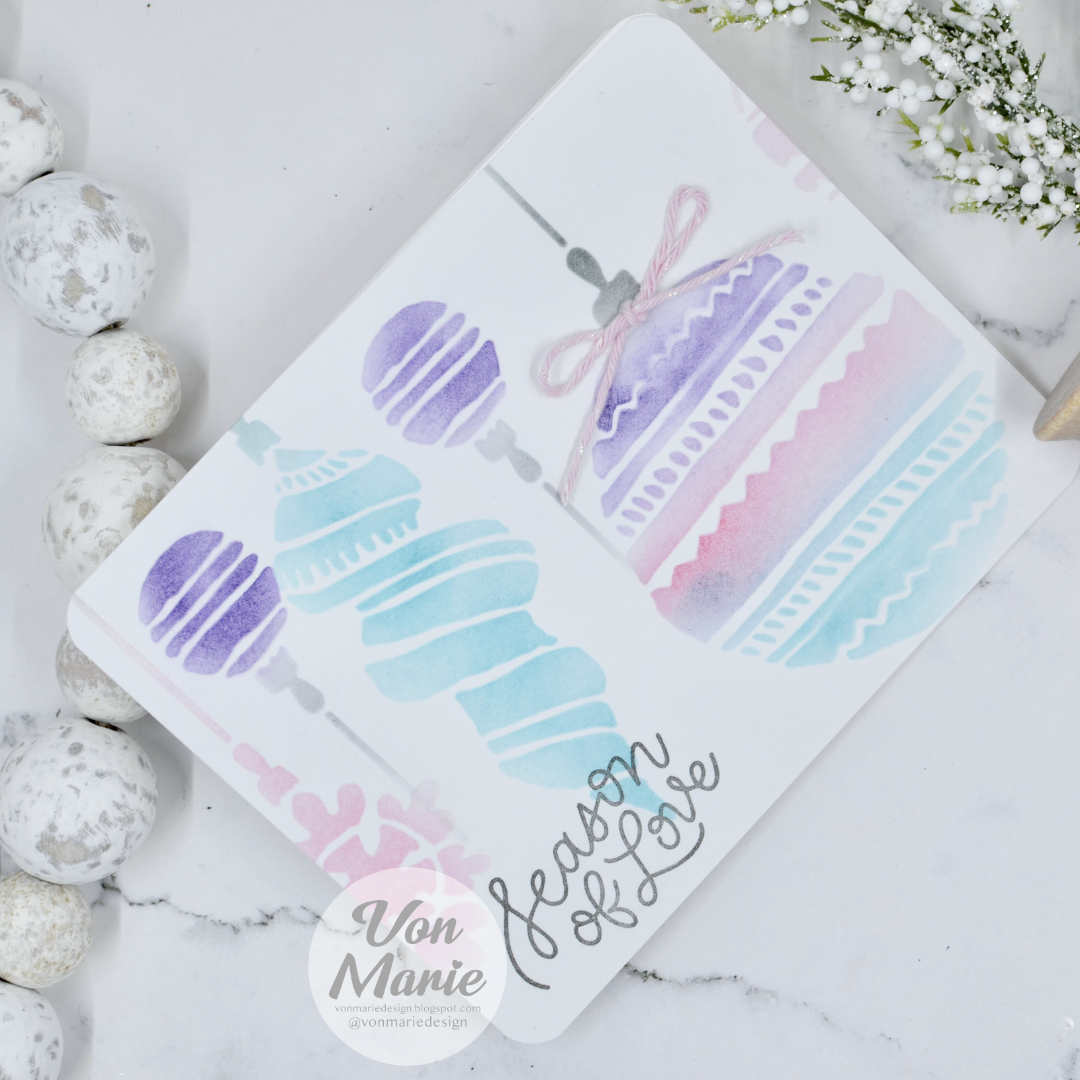
I had so much fun making this card.  I started out with some watercolor paper.  I started spraying it with different Ranger products such as Distress Spritz Sprays in Peacock Feathers, Hickory Smoke, and Uncharted Mariner.  I would dry my background with my heat tool in between sprays.  I also used Distress Ranger Spray stain Picket Fence and Distress Mica Stain in Winter Frost.  


I added in some Distress Paint in Speckled Egg that I flickered onto my background.  I believe the last spray Stain I used is in Salvaged Patina.  I stamped the Postmarks Background Rubber Stamp with Versafine Onyx ink onto my background using a stamping platform.

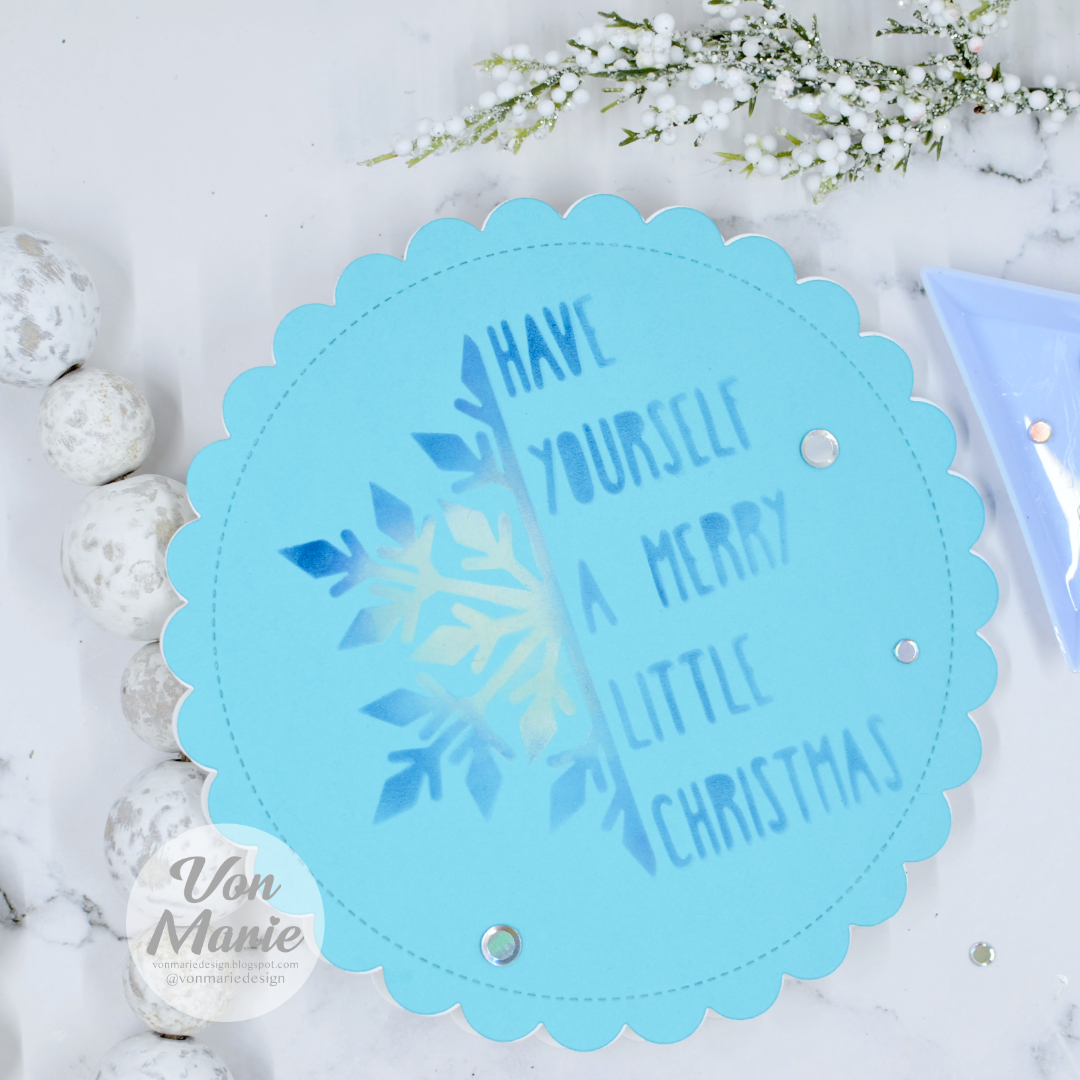
I then used from Whimsy Stamps Merry Christmas Around The World Stamp.  I love the critters image so I stamped it with black ink on Hammermill paper 100 pound.  I colored them in with my alcohol markers.  I cut out my critters out with Whimsy Stamps stitched rectangle die from the Mix and Match Scallops Die.  I also cut out my background with the largest scalloped rectangle die from that set.  I love how sparkly my background looks.


I stamped and heat embossed my sentiment from the Christmas Around The World Stamp using white ink and white embossing powder on black paper.  I fussy cut part of the sentiment and chose to used the Large Merry word  die with matching colored blue paper.  I cut it out 3 times.  I popped up my critters with foam tape and part of my sentiment.  Everything else was glued to a white A2 card base.  I used some Lost Shadow Distress ink with a tiny blending tool from Ranger and inked up my stitched rectangle that has my critters on it.  Snowflakes were also stamped with the same ink from the Christmas Around The World Stamp.  I love how this card came out.  Visit the hop foor losts of inspiration. 

Card Ingredients


Friday, November 22, 2024

Build Your Stash Holiday Cardmakers Sketch 51 Card 2

 Hello everyone.  I have another Holiday card for sketch 51 Build Your Stash Holiday Cardmakers.  I hope your enjoying the sketch.  


I love this cute penguin from Pretty Pink Posh Holiday Signs Stamp.  So I stamped this penguin on white paper 110 pound with memento black ink and colored it in with my alcohol markers.  I fussy cut it out and made sure to stamp a sentiment inside his sign and I stamped a additional one for my sketch that I cut to be a strip.


I used a stitched snowflake backdrop die from Lawn fawn that I cut out with a minty colored paper.  I cut out more pattern papers Hello Winter from Echo Park according to Sketch 51.  Everything was glued with liquid glue to a A2 card base.  I really like how this card came out. I hope you will join us this month you still have time and it will help you get your Holiday Cards Finished.


Thursday, November 21, 2024

Snowflakes, Coffee, And Movies

 Hello everyone.  I have 2 Christmas Cards today.  I used some New stencils from A Colorful Life Designs for some fun and easy cards.


On my first card, I used a couple of New stencils from A Colorful Life Designs called Christmas Coffee and Snowflake Grid.  On white paper 110 pound I used the Christmas Coffee Stencil and inked it with Catherine Pooler Sugared lavender ink for the coffee mug.  I inked the coffee portion with Ground Espresso distress ink.


Next, I inked the sentiment from the same stencil with black ink.  I then placed the Snowflake Grid Stencil over my background and inked it with Peacock Feathers Distress Oxide ink.  I made sure not to ink my mug or sentiment.  I cut my background to be smaller than A2 size and glued it to a colored A2 panel.  I then glued them to a A2 card bae.  I usedsome silver card bling and that finishes this card.


On my second card, I used the Merry Little Christmas Stencil on white paper 110 pound with Catherine Pooler Sugared Lavender ink.  I inked the sentiment carefully with black ink.  I then placed the Snowflake Grid Stencil and ink blended it also with Catherine Pooler Sugared lavender ink.


I cut my background to be smaller than A2 size and layered it on a purple A2 panel.  I glued both to a A2 card base.  I added a white snowflake die-cut from a older Spellbinders DOM November 19.  I ink blended a little bit of that Catherine Pooler Sugared Lavender ink over the snowflake die-cut.  Lastly, I added some card bling to match from a Colorful Life Designs.  I love how both cards came out.  I do love coffee, Christmas movies, and snowflakes.  How about you?  Check out A Colorful Life Designs here and take advantage of my code VonFan10.  These are my last cards for November.  I will be back using A Colorful Life Designs in December.

Here's a Reminder I love this stencil Pop The Cork


Monday, November 18, 2024

Christmas Cup Of Cheer Card

 Hello everyone.  I have a Holiday Coffee Card today.  I used 2 New Stencils for my card today called Cup Of Cheer and Christmas Postmark from A Colorful Life Designs.


I started out with white paper and ink blended Cup Of Cheer Stencil with Concord & 9th inks in Cranberry, Evergreen, and Dove.  I used a copic marker in E55 for the coffee.  Next, I inked up the Christmas Postmark Stencil in Cranberry ink.  I love these stencils.  I inked up the sentiment with Evergreen ink.  I used some residual ink on my yellow blending brush for the star on top of the steam of my Coffee.


I cut out my background using a A2 Postcard craft die from Kat Scrappiness and then glued it to a dark gray A2 card base.  I added some green Crystal Metallic Dragon card bling from A Colorful Life Designs.  I love how this card came out.  Affiliate links may have been used at no extra cost to you.  Visit A Colorful Life Designs here you can use VonFan10 when shopping.

Thank you!


Friday, November 15, 2024

A New Years Card, New Beginnings

Hello everyone.  I have a New Years Card today.  Pretty soon it will be that time, a whole New Year.  I have a easy card to share and I used a stencil to make this easy card .


So I used the New Mid Month Motivation Stencil called Pop The Cork from A Colorful life Designs.  It's such a pretty design and a new mid month stencil is always on sale.  On white paper 100 pound I inked my stencil with Concord and 9th Wheat, Grapefruit, Stardust, and Honeysuckle.  My background was then cut to be 4 1/4 x 5 1/2.


Next, I stamped a sentiment from the Happy  Stamp Set from A Colorful Life Designs with black ink.  I stamped a flower from that set too.  I added a few sequins to match.  My background was glued to a A2 card base.  I love how it came out and hope you grab this stencil while it's on sale and use VonFan10 to save.

Have a Wonderful Day!


Tuesday, November 12, 2024

Watercolor Ornaments Notecard

 Hello everyone.  I have a Notecard today that will make you look like you just watercolored some ornaments.  That's great right?  I used a stencil and it was so easy to make this card.


This stencil called Watercolor Ornaments from A Colorful Life Designs is a 6x9 stencil.  I chose to turn my stencil so that I could fit these thinner ornaments in the empty spaces.  On a A2 Notecard I masked so that I could ink up my ornaments in inks Peacock, Eggplant, Dove, Mushroom, and Honeysuckle from Concord & 9th.


Next, I stamped a sentiment from Simon says Stamp Warmest Wishes Stamp set onto my card in Mushroom ink.  I tied a pink bow and used a corner rounder to round my edges.  I love how it came out. I love that it looks like watercolor and it was only ink.  Visit A Colorful Life Designs newest release here.  


Friday, November 8, 2024

Tree Coffee Card

 Hi everyone.  I managed to get 1 last Holiday coffee card for the Fall Winter Coffee Lovers Blog Hop.


It was easy to make another card using Angie Blom Digital Designs Christmas Joy Mugs Kit. I had printed a few pages so I just colored up this tree to-go cup using my alcohol markers.  I then fussy cut it out leaving a white border. I used a Mugs stencil from Newton's Nook Designs called and inked it with Pine Needles distress Oxide ink and Festive Berries distress oxide ink.  I then cut it out with a stitched rectangle die from Mama Elephant.  I cut out a heart too from that die set.


  I cut out a sentiment from Angie Blom Christmas Joy Mugs and cut it to be a banner.  I glued everything to a A2 card base.  I popped up my to-go cup and sentiment with foam tape.  That finishes my card.  I had fun making this card and I had so much fun this week. I hope you did too.

Thank you 🌲


Fall Farmers Market Card

 Hello I'm so excited about this cute and easy card I created for the Fall Winter Coffee Lovers Blog Hop.  I cannot believe today is the last day, where did that time go? Anywhoo


I just had to make a Fall Farmers Market Quokka Card.  Kat Scrappiness recently released a Add On to the Kissing Booth.  This add on is called Autumn Festival and it has coffee mugs.  So great.  So I used colored paper, and Pattern paper from Crafty Quokka 6x6 Paper Pad.  I also used Coffee Faux Glitter 6x6 paper pack which is a must have.


I did some ink blending with Carved Pumpkin Distress Oxide ink along my booth.  I cut out a pumpkin, and a apple also with my coffee cups.  There is also corn and other fun elements in the Add on set.  I glued everything to a A2 card base. This quokka ephemera is from the Birthday Quokka Ephemera.  I also love the Pumpkin Spice Latte Cup sprinkles Embellishments that I used.  I had so much fun using this card.

Thank you.

Here is what I used on my card from Kat Scrappiness

Kissing Booth Craft Dies

Kissing Booth Add Ons Autumn Festival Craft Dies

Birthday Quokka Ephemera 

Pumpkin Spice Latte Cup sprinkles 

Fall Frame Craft Dies

Coffee Faux Glitter 6x6 Paper Pack

Crafty Quokkas 6x6 Paper Pack

Glitter Blending Brush Silver

Triangle Embellishment Tray White

White Crystal Dual Ended Embellishment Pick Up & Die poker Tool 

Pink Silicone Caddy 

Bearly Art Glue  

Teflon Flat End Bone Folder

Teflon Pencil Bone Folder and Scoring Tool 


Thursday, November 7, 2024

Fall Coffee Shaped Card

 Hello!  I have a Coffee Shaped card for today for the Fall Winter Coffee Lovers Blog Hop.  


I love The Greeting Farm, so I decided to use Brew It Anya.  Anya was stamped with Memento tuxedo black ink on Hammermill paper 100 pounds.  I colored her in with my alcohol markers and then I fussy cut her out with a white border.  I added some white gel accents with my Gelly roll pen.  I then stamped a sentiment from the same stamp set and cut it using my paper trimmer. 


  I found this coffee card in my stash perfect right?  I must have put it together some time ago.  I wish that happened more often 😂. I believe I used Fall Doodlebug pattern paper.  The coffee shaped die I used is from Stamps Of Life.  I then glued Anya and the sentiment with liquid glue onto my coffee card.  I think it's cute.

Thank You💚


Wednesday, November 6, 2024

Christmas Cheer Tag

 Hello everyone.  I have a large tag that I created and it's for coffee.  You can easily gift a box or bag of coffee. I would love a coffee gift.   I used a New Stencil from A Colorful Life Designs.


I love coffee and I said why not make a tag to gift some coffee, maybe a family member will get this gift.  I used a New stencil from A Colorful Life Designs called Christmas Cheer.  I used tan colored paper 100 pound.  I ink blended the coffee art with Ground Espresso distress ink and Hero Arts Hero Hues Unicorn ink.  I ink blended the sentiment from the same stencil using Concord & 9th Poppy ink.


I used a Nested Domed Arches die from Simon Says Stamp.  I cut out another nested domed arch and layered them together to make my tag stronger.  I used 2 different kinds of twine and punched a hole through my tag and then tied my twine to my tag.  I love this stencil.  Next time I will use it for a card.  You can check out the New Release here.


Holiday Peppermint Coffee Card

Hello everyone.  I have a Holiday card today using a fun digital stamp for the Fall Winter Coffee Lovers Blog Hop.


On my card I used Angie Blom Digital Design Super Sponsor Christmas Joy Mugs Kit.  I loved these Mugs, so cute.  I chose to use this mug.  It was easy to color with my alcohol markers and I love the sentiment for a easy card.  I had printed my images on Hammermill paper 100 pound.  


I cut out my mug using a Stitched rectangle die from Super Sponsor Unity Stamp Co. I also used another rectangle die but this one is scalloped and I cut out this green plaid pattern paper that might be also Unity stamp Co.  I then cut out a red A2 paper and layered everything onto a A2 card base. I embellished with some peppermint clay embellishments from Twiddlers Nook that is also a  Super Sponsor. I love Peppermint Coffee,  I have been using Peppermint Mocha creamer everyday in my coffee yum. I also used my white gel pen for some fun accents on my card.  I love how easy this card was.  I hope to use the other mugs this week.

Thank you!!


Tuesday, November 5, 2024

Merry Little Christmas

Hello everyone.  I have a Christmas Card today.  I used a Stencil called Merry Little Christmas that's a New Stencil from A Colorful Life Designs November Release.


I love making shaped cards.  I started out with blue paper and ink blended Merry Little Christmas 6x6 stencil with Concord & 9th Midnight ink. I also used Hero Arts Hues Unicorn White Pigment ink.  


I used Mama Elephant Stacked circles dies to cut my background out.  I scored a second circle that I cut out with white paper 110 pound to make my card base. I glued my stenciled circle to my white scored circle to make my shaped card complete.  I embellished with some metallic silver card bling from A Colorful Life Designs.  


Build Your Sketch Holiday Cardmakers Card Sketch For April

 Hello everyone.  Happy April.  I'm so happy to share a New Sketch from Build Your Stash Holiday Cardmakers Sketch 56 .  This is a fun s...